![]()
![]()
![]()
![]()
![]()
![]()
![]()
Configuration of a fitting run
Danger
Input Files
SPARTAN relies on numerous input files that are pre-computed (e.g. stellar population, IGM extinction, etc). To make use of SPARTAN you must download them at this link. These are not being computed on the fly which saves a lot of time in the fitting process. See detail below on how to use them.
General concept
The configuration of SPARTAN contains all the information required to make SPARTAN works for any type of fitting. To create it you have two solutions:
Using the Text-based User-Interface (Hereafter TUI): This is an interface that is displayed in the terminal itself. It will guide you through each part of the configuration make sure (as much as possible) that the configuration make sense (there are a lot of checks). This TUI is filling for you a configuration file that is needed to run a fit.
Direclty editing the configuration file that looks like this:
[General]
project_name =
author = romain
project_directory =
ncpu =
data_cat =
use_spec =
use_phot =
nspec =

[Spectroscopy]
spectra_directory =
resolution =
flux_units =
wave_units =
skip_edges =
size_skipped =
bad_regions =
bad_regions_list =
normalisation_type =
norm_region =
multi_spec_calibration =

[Photo]
system =
photofile =

[Cosmo]
ho =
omega_m =
omega_l =
use_cosmo =

[Library]
type =
basessp =
dustuse =
ebvlist =
igmtype =
emline =
emline_skipped =
age =
tau =
met =

[Fit]
algorithm =
overfit =
pdf_values =
best_fit_values =
keep_full_pdf =
combined =
It is worth noting that it is recommended to use the TUI to avoid mistakes in the configuration. Through the next section we will guide you through the configuration process. We will each time provide a screenshot of the TUI and the corresponding section of the configuration file. We will place ourself in the case we fit both photometry and spectroscopy, the most general case SPARTAN accepts.
Start the TUI
As said in Getting started, you start SPARTAN using the command line. For a brand new project, you write in the terminal:
[user@machine]$ spartan -t (or --tui)
This will load the text based user interface (TUI) with an empty project. If you happen to have an already defined project, you must precise the file that the TUI will use:
[user@machine]$ spartan -t /path/and/file.conf (or --tui)
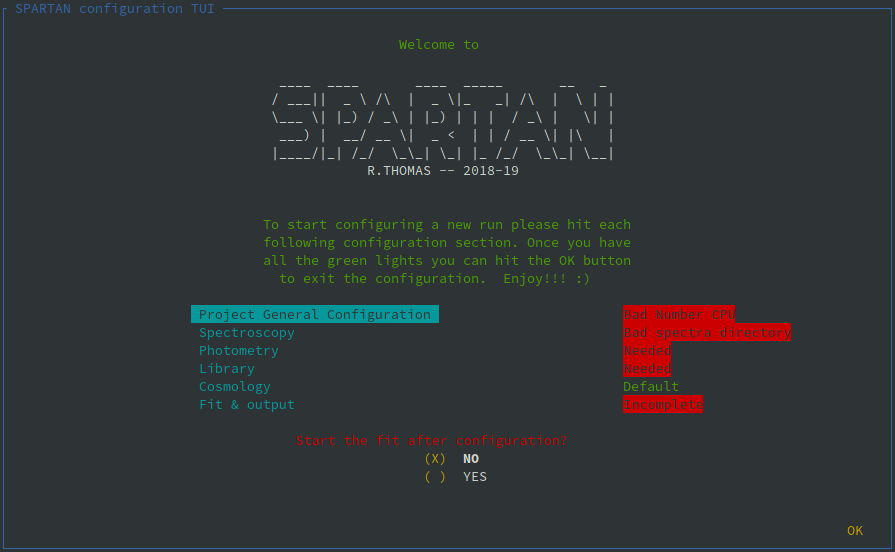
To make sure that the TUI is well displayed the size of your terminal must be at least 30x80. If this is the case, running one of the command above will lead you to the front frame of the TUI that you can see below.
Important
To navigate through the TUI you need the arrow keys of your keyboard to move from on element to another and the carriage return to enter a new element. The space bar is used to select a choice in a multiple choice element (see below).
This frame contains the SPARTAN logo and the welcome message. These are fixed components. Then you haves an area with 6 entries: Project general Configuration, Spectroscopy, Photometry, Library, Cosmology, Fit & output. Each section corresponds to a TUI-frame that will help you through the configuration of your fitting run. On the same line as the section, a keyword is displayed. If it is green (like for the Cosmology section in the screenshot above), it means that the section is correctly configured. In green you can have ‘Default’ or ‘Done’. Once each section status is in green you can start a fitting run. If you made a mistake during the configuration (or something is missing), the status will be displayed in red. The red status keywords should be clear enough by themselves. Each one will be reviewed in the next sections so you have a more detailed description of the error and a work around.
Below this sections you have a choice to start the fitting run from the TUI or not. Select your choise with the space bar. If you choose not to start it from the TUI you can still do it from the Command Line Interface.
Finally, to Leave the TUI you must go to the ‘OK’ at the bottom right and press enter.
General Configuration
#--> This corresponds to this section in the configuration file


[General]
project_name = SPARTAN_paper_comb
author = romain
project_directory = /home/romain/Science/SPARTAN_paper/fit
ncpu = 4
data_cat = /home/romain/Science/SPARTAN_paper/run/SPARTAN_paper1_Combined_file_final.txt
use_spec = Yes
use_phot = Yes
nspec = 1
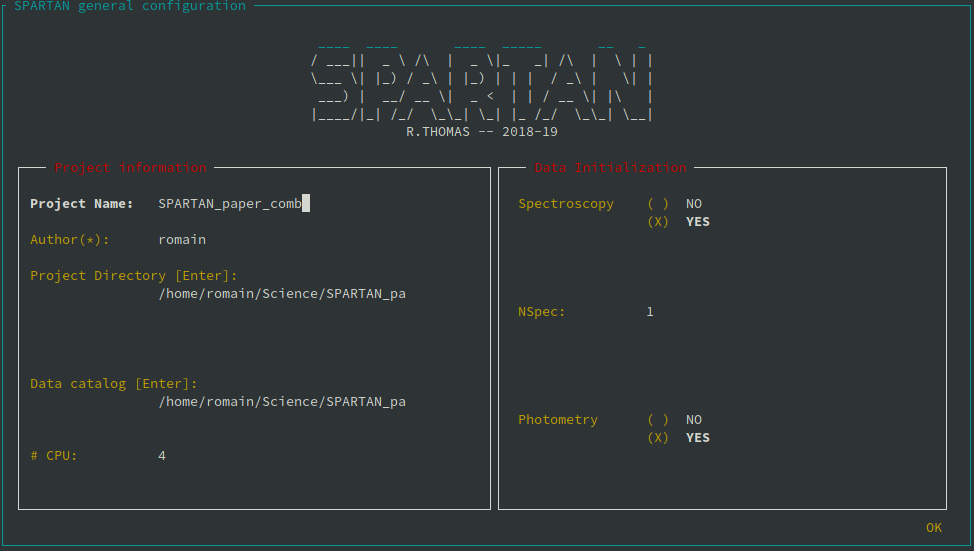
To start configuring a fitting run, you enter the Project General Configuration page of the TUI (you can see it above). This frame deal with general information:
Project Name: This is how you call your fitting run/project. This name must note contain spaces.
Author: Well, you…. It is worth noting that this value is not used anywhere in the code. So you can write whatever you want here (e.g. date). It will be written in the configuration file.
Project Directory: This is where the data will be saved (the current directory). To modify the value you must press enter and navigate.
CPU: SPARTAN has been coded to do parallel processing. Here you tell SPARTAN how much CPU’s you want to use at the same time (i.e., how much object can be fitted in parallel).
Spectroscopy: Yes or no if you use spectroscopy
NSpec: in case the previous field was ‘yes’, tell how many spectra per object you have.
Photometry: Yes or not to use the photometry (no if you want to fit spectra only).
This part of the TUI translated into the section General in the configuration file. For the configuration of the above screenshot we have the configuration file section that is displayed next to the screenshot.
Spectroscopic configuration
If you have spectroscopic data, you must then tell SPARTAN where they are and what is your configuration.
#--> This corresponds to this section in the configuration file


[Spectroscopy]
spectra_directory = /home/romain/Science/SPARTAN_paper/run/spectra
resolution = 230
flux_units = erg/s/cm2/A
wave_units = Ang
skip_edges = Yes
size_skipped = 200
bad_regions = Yes
bad_regions_list = 1200-1240;3700-3740
normalisation_type = region
norm_region = 3500-3700
multi_spec_calibration = No
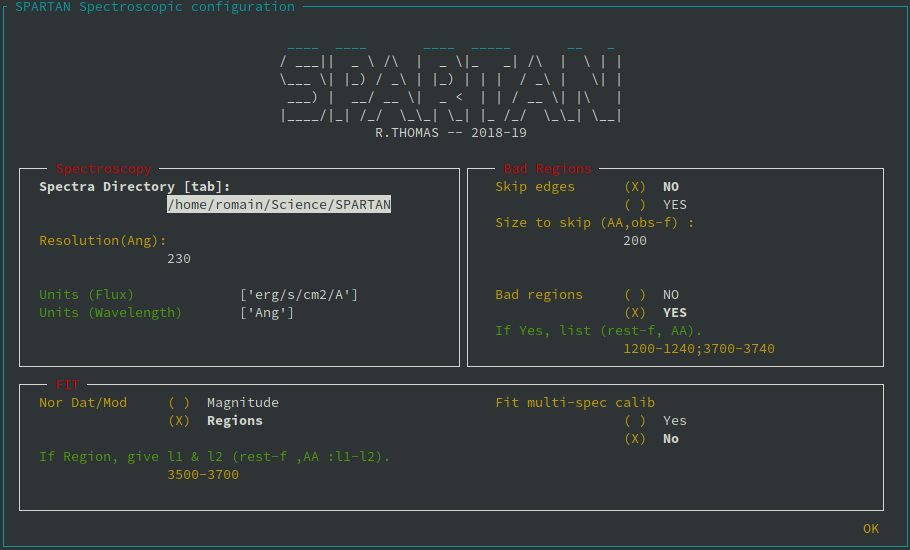
We detail here each entry of the TUI:
Spectra Directory: This is where your spectra are stored (in ascii format!! and with a .spec extension).
Resolution: This is the average reoslution (R=l/dl) of your spectra.
Units (flux) and Units (wavelength): Here you can choose the units of your spectra. Both for the flux density and the wavelength.
Skip Edges: It can happen that the edges of your spectra are not well cleaned. SPARTAN offers you the opportunity to remove them from the fit. If you say yes, here you must also give the size to skip at the edged with Size to skip (AA, obs-f). You must give it in angstrom and in the observed frame.
Bad regions: Also, you might want to mask out some part of the spectrum (e.g. emission lines). You can also do it SPARTAN putting yes at this choice. Then you must give the regions you want to mask out in If Yes, list (rest-f, AA). In that case you must give the two external wavelength of each region you want to mask out (ex: 3700-3750; 1200-1240)
Nor Dat/Mod: This is where you tell SPARTAN how to normalize the templates to the data. You can do it with the photometric point you give in the catalog or with a restframe region that will be taken into account for the normalization. In the latter case you must give this the wavelengths of this restframe region (l1-l2) in Angstrom.
Fit multi-spec calib: This applies only if you fit multi-spectroscopic data. In this case you can ask SPARTAN to try to fit the relative flux calibration between both spectra (this is rather experimental for the moment and not offered in the current version of the software).
Photometric configuration
#--> This corresponds to this section in the configuration file
[Photo]
system = AB
photofile = /home/romain/Science/SPARTAN_paper/fit/SPARTAN_paper_comb.mag
##This is the magnitude configuration file.
##It is called here SPARTAN_paper_comb.mag

#Mag            Filter          Fit     Out     Abs     Norm
i-megacam       i-megacam       yes     yes     yes     yes
u-megacam       u-megacam       yes     yes     yes     no
g-megacam       g-megacam       yes     yes     yes     no
r-megacam       r-megacam       yes     yes     yes     no
i-megacam       i-megacam       yes     yes     yes     yes
z-megacam       z-megacam       yes     yes     yes     no
J-wircam        J-wircam        yes     yes     yes     no
H-wircam        H-wircam        yes     yes     yes     no
K-wircam        K-wircam        yes     yes     yes     no
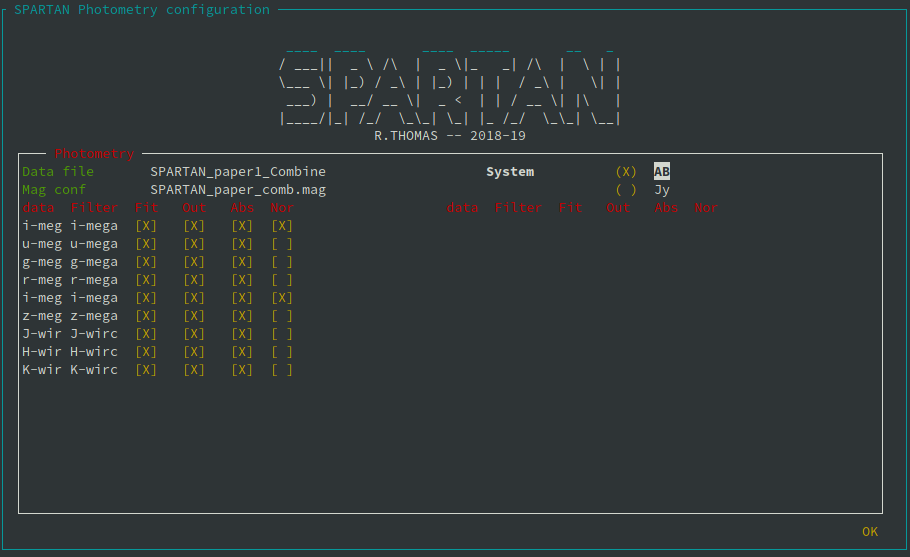
This section is for photometric configuration. You also need to use it for spectroscopy!!!. You must choose your photometric system (AB of Jansky[Jy]). Then SPARTAN will read the data catalog you gave in the general configuration section and will extract the name of each filter that is in your catalog. For each filter, a line will be created with the name of the filter from the catalog, and 5 fields to complete. First you must select the corresponding filter from the filter library of SPARTAN (if your filter is not yet there, please drop me a mail). Then you must choose if this filter will be used during the fit, if your want the magnitude in this filter to be computed from the best fit template, if you want to compute the absolute magnitude, if you want to use this filter for normalisation (you can selec more than one). All this photometric configuration will be written in a magnitude file (project_name.mag) that you can see above next to the screenshot. The path and name of this file will be written in the global configuration file (see above).
Template configuration
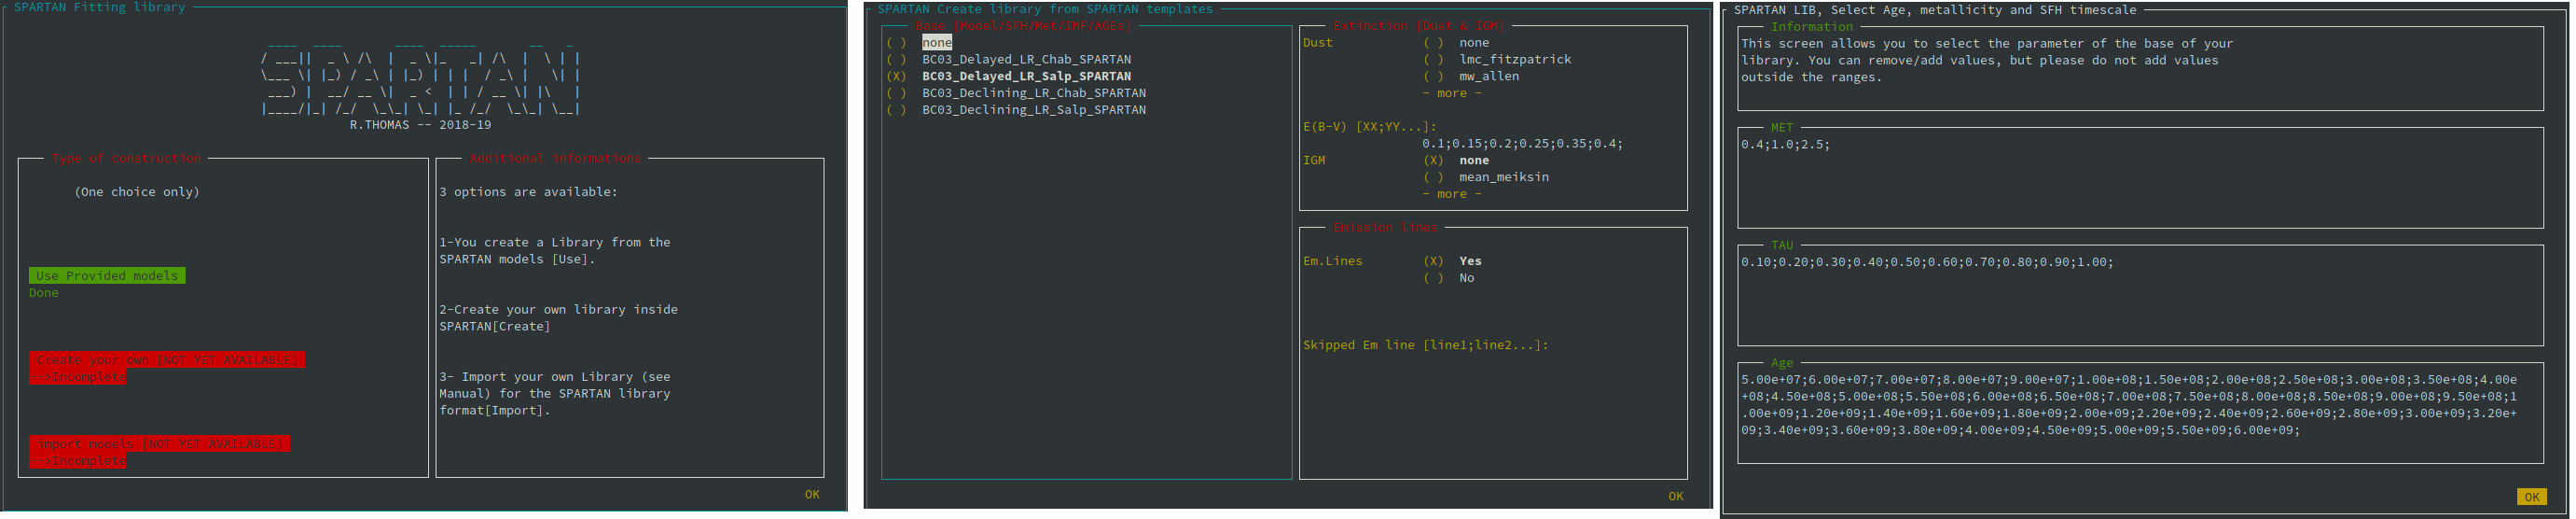
The configuration of the template that will be used during the fit is done through a 3 windows process (see the screenshot above with the three windows).
First You must choose the type of construction. For the moment you can only choose the Provided models option. In the future version of SPARTAN we will implement the option to provide your own library of template or to create your own template. The option currently offers a lot of possibilities (see Templates for more information).
Once you pass that selection, you enter a window where you can select:
The SSP Base: Currently four choices are available with different IMF and SFH.
The Dust and IGM extinction:
For dust, you must choose the prescription and give a list of E(B-V) values. You can also give choose ‘none’.
For IGM, you must choose between the 4 possibilities.
Emission lines. You choose to add them or not in the templates. You can also skip some that will not be added during the fit. The list of available emission lines is available in the input files Emline/Anders_Fritze_2003.dat. To ignore one of them you just need to write its name.
After this first parameters to select you must select the parameter range of the SSP based you choosed:
Metallicity [in solar metallicity]: This is the stellar metallicity of the template. You can not add any of them but you can remove some if you are willing to.
TAU [in Gyr]: For this parameter you put any value between 0.1 Gyr and 10.0 Gyr.
Age [in yr]: For this parameter you can also put any value between 1e6yr and 1.5e10yr.
The configuration you see in the screenshots above translate to the following block in the configuration file:
[Library]
type = provided
basessp = BC03_Delayed_LR_Salp_SPARTAN
dustuse = calzetti
ebvlist = 0.1;0.15;0.2;0.25;0.35;0.4;0.45;0.5
igmtype = none
emline = yes
emline_skipped =
age = 5.00e+07;6.00e+07;7.00e+07;8.00e+07;9.00e+07;1.00e+08;1.50e+08;2.00e+08;2.50e+08;3.00e+08;3.50e+08;4.00e+08;4.50e+08;5.00e+08;5.50e+08;6.00e+08;6.50e+08;7.00e+08;7.50e+08;8.00e+08;8.50e+08;9.00e+08;9.50e+08;1.00e+09;1.20e+09;1.40e+09;1.60e+09;1.80e+09;2.00e+09;2.20e+09;2.40e+09;2.60e+09;2.80e+09;3.00e+09;3.20e+09;3.40e+09;3.60e+09;3.80e+09;4.00e+09;4.50e+09;5.00e+09;5.50e+09;6.00e+09
tau = 0.10;0.20;0.30;0.40;0.50;0.60;0.70;0.80;0.90;1.00
met = 0.4;1.0;2.5
Cosmological configuration
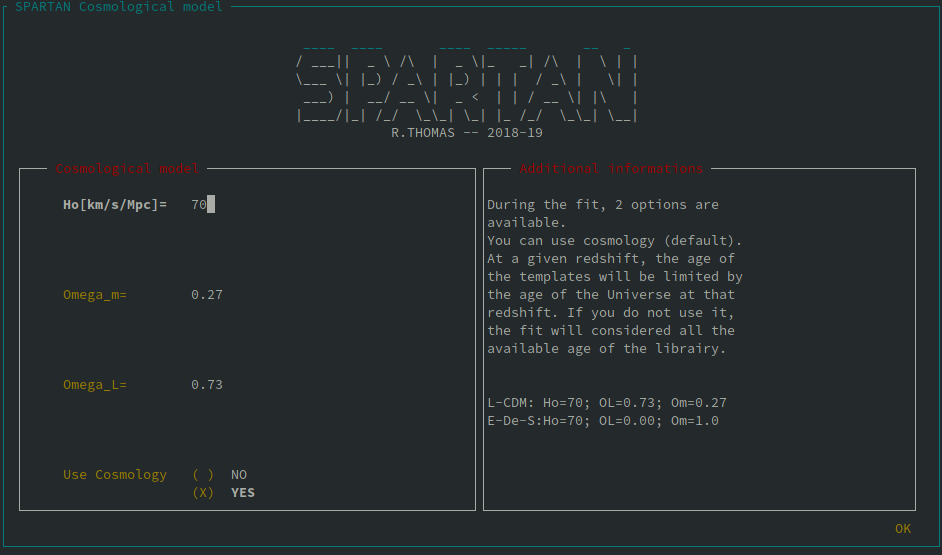
#--> This corresponds to this section in the configuration file


[Cosmo]
ho = 70
omega_m = 0.27
omega_l = 0.73
use_cosmo = Yes
When doing the fit, you can ask SPARTAN to take into account a cosmological model. This means that at a given redshift, the possible age of the templates will be smaller than the age of the Universe at that redshift. By default, the use is set on Yes with the Lambda-CDM model. You must provide here:
Ho: The HUbble constant
Omega_m: matter density
Omega_L: Dark Energy density
Use Cosmology: If you want to use cosmological constraints during the fit
Fitting and output configuration
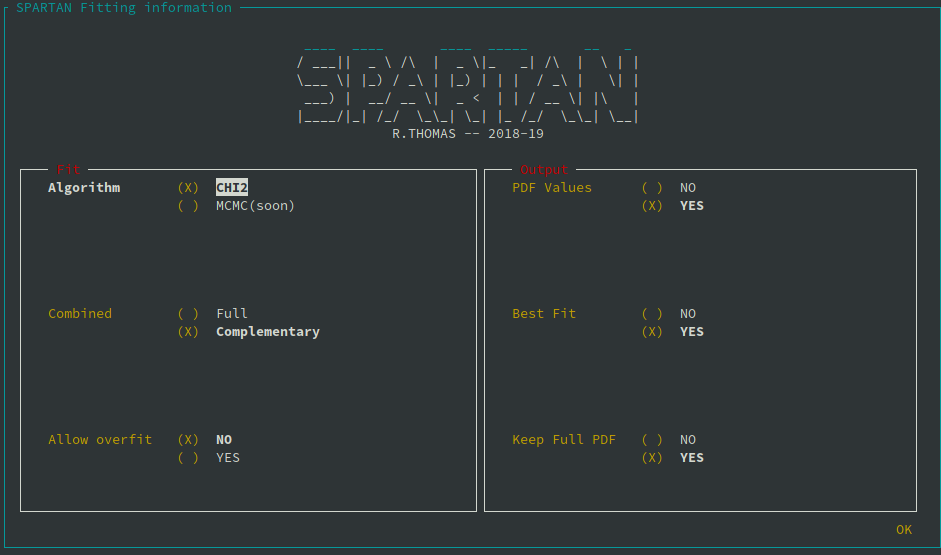
#--> This corresponds to this section in the configuration file

[Fit]
algorithm = CHI2
overfit = No
pdf_values = Yes
best_fit_values = Yes
keep_full_pdf = Yes
combined = complementary
Finally, you can choose what kind of fit and output you want. In the panel (see above) you can:
Choose the type of fitting. As for now the MCMC is not implemented yet so you can only choose the CHI2 minimization.
When fitting both photometry and spectroscopy you can choose to either fit all the data (Combined = Full) or only complementary data (Combined = Complementary). In the latter case the fit will not take into account data that overlap and the priority will always be given to spectroscopy over photometry. So if you have a photometric point that overlaps with a spectrum this point will be ignored.
You can choose to allow overfit. By default it is set to NO which means that if you restart a fit run that was already started but not completed, SPARTAN will not refit the data that are already fitted. If you allow overfit it will fit them again.
Output: PDF Values. You can choose to save (choice by default) or not the PDF values (values and associated errors).
Output: Best fit. You can choose to save (choice by default) or not the values of the best fit template.
Output: Keep full PDF. You can choose to save the full PDFs. Meaning that after you will be able to plot them. This might take a lot of disk space.